Unraveling the Mystery: Angular Project Setup & its File Structure Made Simple!

A developer documenting his knowledge. #keepLearning #keppGrowing
Angular, a powerful front-end framework, has rapidly gained popularity among developers for building dynamic and feature-rich web applications. As with any technology, understanding the project file structure is crucial for efficient development and easy collaboration. In this blog, we'll embark on an exciting journey to unravel the mystery behind Angular's project file structure, demystifying its complexities in simple terms. By the end of this article, you'll be equipped with the knowledge to navigate through your Angular projects with ease, making development a breeze!
Benefits of Understanding the Project Structure:
By grasping Angular's project file structure, developers can experience several advantages:
Enhanced Collaboration: When team members follow a consistent file structure, collaboration becomes smoother, and developers can easily find and understand each other's code.
Scalability: As your application grows, a well-structured file system ensures scalability without introducing unnecessary complexities.
Troubleshooting Made Easy: Understanding the project structure aids in identifying issues promptly, as developers know where to look for specific code blocks.
Welcome to the Angular Ecosystem:
Before diving into the project file structure, let's take a moment to understand the Angular ecosystem briefly. Angular follows a component-based architecture, where different components work together to create a cohesive user interface. These components are structured within modules, making the application modular and maintainable.
Create a New Angular Project:
Open your terminal or command prompt and run the following command to generate a new Angular project:
ng new my-angular-project
Replace "my-angular-project" with the desired name for your project. Angular CLI will create a new folder with this name and set up the initial project structure and configuration files.
You will get some questions before creating the project in your directory, like:
? Would you like to add Angular routing? (y/N) y
**as I want the routing by default**
? Which stylesheet format would you like to use? (Use arrow keys)
❯ CSS
  SCSS   [ https://sass-lang.com/documentation/syntax#scss                ]
  Sass   [ https://sass-lang.com/documentation/syntax#the-indented-syntax ]
  Less   [ http://lesscss.org                                             ]

** select which stylesheet format you want to use, I am going wiht CSS.
    You can change by up/down arrow **
Right after you select the stylesheet format it will create all the required files and start downloading the node module as it has all the required dependencies that an angular project requires to run. After completing this you will get a successful message. Please check the below details of how exactly it will look after the installation.
icluster@Bibhas-iMac inditrunk % ng new my-angular-project
? Would you like to add Angular routing? Yes
? Which stylesheet format would you like to use? CSS
CREATE my-angular-project/README.md (1070 bytes)
CREATE my-angular-project/.editorconfig (274 bytes)
CREATE my-angular-project/.gitignore (548 bytes)
CREATE my-angular-project/angular.json (2760 bytes)
CREATE my-angular-project/package.json (1049 bytes)
CREATE my-angular-project/tsconfig.json (901 bytes)
CREATE my-angular-project/tsconfig.app.json (263 bytes)
CREATE my-angular-project/tsconfig.spec.json (273 bytes)
CREATE my-angular-project/.vscode/extensions.json (130 bytes)
CREATE my-angular-project/.vscode/launch.json (470 bytes)
CREATE my-angular-project/.vscode/tasks.json (938 bytes)
CREATE my-angular-project/src/main.ts (214 bytes)
CREATE my-angular-project/src/favicon.ico (948 bytes)
CREATE my-angular-project/src/index.html (302 bytes)
CREATE my-angular-project/src/styles.css (80 bytes)
CREATE my-angular-project/src/app/app-routing.module.ts (245 bytes)
CREATE my-angular-project/src/app/app.module.ts (393 bytes)
CREATE my-angular-project/src/app/app.component.css (0 bytes)
CREATE my-angular-project/src/app/app.component.html (23115 bytes)
CREATE my-angular-project/src/app/app.component.spec.ts (1027 bytes)
CREATE my-angular-project/src/app/app.component.ts (222 bytes)
CREATE my-angular-project/src/assets/.gitkeep (0 bytes)
✔ Packages installed successfully.
hint: Using 'master' as the name for the initial branch. This default branch name
hint: is subject to change. To configure the initial branch name to use in all
hint: of your new repositories, which will suppress this warning, call:
hint:
hint:     git config --global init.defaultBranch <name>
hint:
hint: Names commonly chosen instead of 'master' are 'main', 'trunk' and
hint: 'development'. The just-created branch can be renamed via this command:
hint:
hint:     git branch -m <name>
    Successfully initialized git.
Navigate to the Project Directory:
Change your working directory to the newly created project folder using the 'cd' command:
cd my-angular-project
Now in this directory, you can see the newly created angular project with all the files. Here we will be discussing those files in detail, what is the purpose of those files, and everything you need to know about them.
Unfolding the Project File Structure:
The heart of every Angular application lies in its file structure, which provides the organization and hierarchy necessary for smooth development. Let's break it down step-by-step:
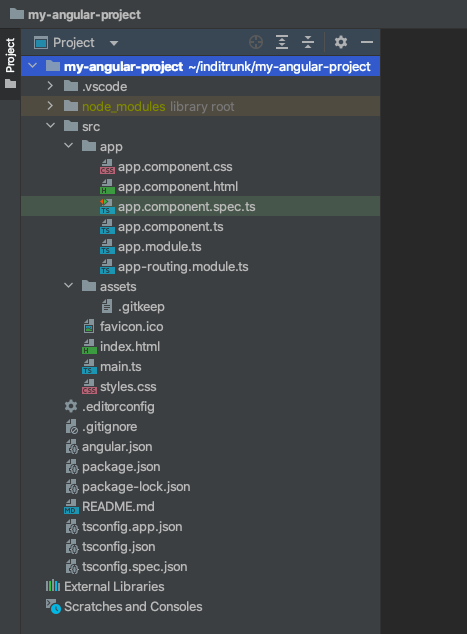
src Folder: The 'src' folder, short for "source," is the cornerstone of your Angular application. It contains all the code you'll write, including components, services, styles, and assets.
app Folder: Inside the 'src' folder, you'll find the 'app' folder, housing the root component and the application logic. This component acts as the starting point of your app. In this folder, you will get the initially created component, module, and one routing file(module). you can check the below image.
let's talk about those files now.
1.1 app.component.css You can understand what this file does by the name of this file. Yes, you guessed it right, this file contains all the CSS classes that we are going to use till we are not creating any new components.
1.2 app.component.html: Initially we are going to use this file for printing the content. We can write and edit this page as per our requirements.
1.3 app.component.spec.ts: This file contains unit tests for the main AppComponent. When running tests using the Angular CLI, all unit tests in files with the *.spec.ts extension will run.
1.4 app.component.spec.ts: The
Componentdecorator allows the user to tag a class as an Angular component. Additional information in the metadata determines how the component should be instantiated, processed, and used at runtime.selectoridentifies the directive in the template and triggers the instantiation of the respective directive.templateUrlis the template file's relative or absolute path for an Angular component.styleUrlsare the relative or absolute paths containing CSS stylesheets for the component. There can be one or more URLs in the component decorator.
1.5 app.module.ts: Angular applications are modular and Angular has its own modularity system called NgModules. NgModules are containers for a cohesive block of code dedicated to an application domain, a workflow, or a closely related set of capabilities. They can contain components, service providers, and other code files whose scope is defined by the containing NgModule. They can import functionality that is exported from other NgModules, and export selected functionality for use by other NgModules.
Every Angular application has at least one NgModule class, the root module, which is conventionally named AppModule and resides in a file named app.module.ts. You launch your application by bootstrapping the root NgModule.
While a small application might have only one NgModule, most applications have many more feature modules. The root NgModule for an application is so named because it can include child NgModules in a hierarchy of any depth.
1.6 app-routing.module.ts: The purpose of this file is to keep the routes in a separate file. It is just a good practice to have routes defined in a separate file.
assets: Any static resources, such as images, fonts, or configuration files, are placed in the 'assets' folder. These resources are directly accessible by your application.
favicon.ico: As we all know that favicon is an icon to use for this application in the bookmark bar.
index.html: The primary HTML page is served when a visitor accesses your website. The CLI automatically incorporates all JavaScript and CSS files during the app's build process, eliminating the need for manual <script> or <link> tag additions.
main.ts: The central entry point of your application, responsible for compiling the application using the JIT compiler and initiating the root module (AppModule) to run in the browser.
styles.css: Enumerates the CSS files responsible for providing styles to your project, with the file extension indicating the style preprocessor configured for the project.
Below is a table listing the Angular Workspace configuration files along with their details:
| Configuration File | Purpose and Details |
| .editorconfig | This file is mainly for the configuration of code editors. |
| .gitignore | In this file, we will mention the files or the folders which should be untracked and Git should ignore them. |
| README.md | Basically this we use for an introduction to our root application. |
| angular.json | This file serves as the core configuration file for your Angular workspace. It defines various settings for building, serving, and testing your application. You can specify the project's root, asset paths, output directory, and more. The "projects" section allows you to manage multiple projects within the same workspace. |
| tsconfig.json | The tsconfig.json file contains TypeScript compiler options for your project. It lets you specify the compiler settings, target version, module resolution, and other TypeScript-related configurations. The Angular CLI and build process use this file to compile your TypeScript code. |
| tsconfig.app.json | This file is a variant of tsconfig.json, specifically used for the app project within the workspace. You can define app-specific TypeScript compiler options, which will override the settings from tsconfig.json. This allows you to fine-tune TypeScript configurations for your Angular application. |
| tsconfig.spec.json | Similar to tsconfig.app.json, tsconfig.spec.json is used for configuring TypeScript options for running tests. It contains settings that are specific to the test environment and will override the configurations from tsconfig.json for testing purposes. |
| tslint.json | The tslint.json file contains the configuration for TSLint, a static code analysis tool for TypeScript. You can set coding rules and guidelines for maintaining consistent code styles and best practices. The Angular CLI uses this file to lint your TypeScript code during development and building processes. |
| package.json | The package.json file manages the dependencies and scripts for your Angular project. It includes a list of all the packages your project depends on, along with their respective versions. Additionally, you can define custom scripts to perform various tasks like building, testing, or serving the application. |
| package-lock.json | This file is automatically generated by npm and serves as a lock file, which keeps track of the exact versions of packages installed in your project. It ensures that all team members work with identical package versions, reducing the chances of dependency conflicts. |
| node_modules/ | This is not a file but a directory created by npm. It houses all the packages and dependencies installed for your Angular project. When you run "npm install" or "npm update," npm fetches and stores the required packages in this directory. It is not recommended to manually modify files inside this directory. |
In conclusion, To sum up, understanding Angular's project file structure is a crucial milestone in your journey toward becoming a skilled Angular developer. By comprehending the organizational hierarchy, component-based architecture, and essential configuration files, developers can effortlessly craft robust and maintainable applications. Armed with this newfound knowledge, venture into Angular's ecosystem with confidence, and set sail on your path to creating stunning web applications! Happy coding!


